How to Apply SSL for HTTPS on a WebApp Hosted in AWS S3 Bucket
Have you ever hosted your web app on AWS S3 and noticed that it only serves over HTTP instead of HTTPS? This guide walks you through the full setup using Route 53, AWS Certificate Manager, and CloudFront to get that padlock in the address bar.
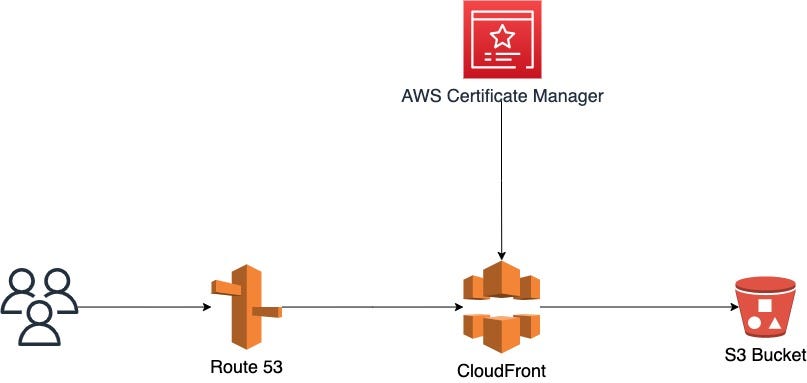
Steps Overview
- Register domain name using Route 53 (or point your nameservers to AWS)
- Generate SSL certificate for your domain via AWS Certificate Manager
- Create S3 bucket with same name as your domain (e.g. codewithdad.com)
- Create CloudFront Distribution pointing to your S3 bucket using the HTTP link
- Create an A record in Route 53 pointing to your CloudFront Distribution
Step 1: Register Domain with Route 53


- Access the Route 53 service in AWS
- Create a Hosted Zone named after your domain
- Either register the domain directly through Route 53, or point your existing domain's nameservers to the ones AWS provides
Step 2: Generate SSL Certificate via Certificate Manager


- Navigate to AWS Certificate Manager
- Click "Request a certificate" and select "Request a public certificate"
- Enter your domain name and use the default validation settings
- Note: Processing can take approximately one hour — grab a coffee
Step 3: Create S3 Bucket
Critical: The bucket name must match your desired domain exactly (e.g. codewithdad.com).


- Navigate to S3 and create a new bucket using your domain name
- Uncheck "Block all public access" and acknowledge the warning
- After creation, go to bucket Properties and enable Static Website Hosting
- Set
index.htmlas the default for both the Index and Error document fields


Apply this bucket policy to allow public read access (go to Permissions → Bucket Policy):
{
    "Version": "2012-10-17",
    "Statement": [
        {
            "Sid": "PublicReadGetObject",
            "Effect": "Allow",
            "Principal": "*",
            "Action": "s3:GetObject",
            "Resource": "arn:aws:s3:::your-bucket-name-here/*"
        }
    ]
}


- Upload your website content. For React apps: upload the contents of the BUILD folder, not the folder itself


- Test by visiting the S3-provided static website URL to confirm everything loads
Step 4: Create CloudFront Distribution

Important warning: When entering the Origin Domain, paste the HTTP link directly from your S3 static website endpoint — do NOT select the bucket from the dropdown. The dropdown option uses a different URL format that breaks routing.

- Create a new CloudFront Distribution
- Paste your S3 bucket's static website URL as the Origin Domain (strip the
http://prefix) - Under Viewer Protocol Policy, select "Redirect HTTP to HTTPS"
- For Allowed HTTP Methods, select: GET, HEAD, OPTIONS, PUT, POST, PATCH, DELETE
- Under Alternate Domain Names (CNAMEs), add your domain — this is not optional
- Select your SSL certificate from the dropdown (the one you created in Step 2)
- Complete and create the distribution (it can take 10–20 minutes to deploy globally)


Once deployed, copy the Distribution Domain Name and open it in a browser to confirm your content loads over HTTPS.
Step 5: Create an A Record in Route 53

- Return to Route 53 and select your hosted zone
- Click "Create record"
- Set the record type to A
- Enable the Alias toggle
- For the route traffic target, select "Alias to CloudFront distribution"
- Select your CloudFront distribution from the list
- Save the record

Result

Give DNS a few minutes to propagate, then visit your domain. You should see the padlock icon confirming HTTPS is active. Your S3-hosted web app is now served securely over the internet.